Tag: Apache Spark
Blogs
Performance Tuning on Apache Spark
Performance tuning is an important aspect of working with Apache Spark, as it can help ensure that your data processing tasks are efficient and run smoothly. In this blog post, we will delve into the common issues that can be considered when tuning the performance of Apache Spark. These issues include spill, skew, shuffle, storage, and serialization.
Spill One problem that can occur is spill, which is the writing of temp files to disk due to a lack of memory.
read more
Blogs
read more
Install Apache Spark 2 on Ubuntu 16.04 and Mac OS
Two of the earlier posts are discussing installing Apache Spark-0.8.0 and Apache Spark-1.1.0 on Ubuntu-12.04 and Ubuntu-14.04 respectively. In this post you can discover necessary actions to set up Apache Spark-2.0.2 on Ubuntu 16.04 and Mac OS X Sierra. For enhanced guidance refer above mentioned posts.
Blogs
How to Run a PySpark Notebook with Docker
Apache Spark is a powerful big data processing engine that is well-suited for use in a distributed environment. One way to interact with Spark is through the use of an IPython Notebook, which allows you to run and debug your Spark code in an interactive manner. This tutorial will guide you through the process of setting up and running a PySpark Notebook using Docker.
Installing Docker Docker is a containerization platform that allows you to package and deploy your applications in a predictable and isolated environment.
read more
Blogs
read more
Self Contained PySpark Application
In my previous post, I wrote about installation of Spark and Scala interactive shell. Here in this post, we’ll see how to do the same in Python.
Similar to Scala interactive shell, there is an interactive shell available for Python. You can run it with the below command from spark root folder:
./bin/pyspark
Now you can enjoy Spark using Python interactive shell.
This shell might be sufficient for experimentations and developments. However, for production level, we should use a standalone application.
Blogs
read more
Install Apache Spark on Ubuntu-14.04
Update: For Apache Spark 2 refer latest post
One of the previous post mentioning about install Apache Spark-0.8.0 on Ubuntu-12.04. In this post explain about detailed steps to set up Apache Spark-1.1.0 on Ubuntu. For running Spark in Ubuntu machine should install Java. Using following commands easily install Java in Ubuntu machine.
	$ sudo apt-add-repository ppa:webupd8team/java
	$ sudo apt-get update
	$ sudo apt-get install oracle-java7-installer
To check the Java installation is successful
$ java -version
It shows installed java version
java version "1.7.0_72"_ Java(TM) SE Runtime Environment (build 1.7.0_72-b14)_ Java HotSpot(TM) 64-Bit Server VM (build 24.72-b04, mixed mode)
In next step is install Scala, follow the following instructions to set up Scala.
Blogs
read more
Creating an Assembled JAR for a Standalone Spark Application
In this post, we will discuss how to create an assembled JAR for a standalone Spark application using the sbt-assembly plugin. One of my previous posts, we discussed how to build a stand alone Spark Application using SBT eclipse plugin. Now, we will take it one step further and show you how to create a fat JAR for your Spark project using the sbt-assembly plugin.
Adding the sbt-assembly Plugin
The first step in creating an assembled JAR for your Spark application is to add the sbt-assembly plugin. To do this, you will need to add the following line to the project/plugin.sbt file:
addSbtPlugin("com.eed3si9n" % "sbt-assembly" % "0.9.1")
Configuring Assembly Settings
Next, you will need to specify sbt-assembly.git as a dependency in the project/project/build.scala file:
import sbt._

object Plugins extends Build {
  lazy val root = Project("root", file(".")) dependsOn(
    uri("git://github.com/sbt/sbt-assembly.git#0.9.1")
  )
}
In the build.sbt file, add the following contents:
Blogs
read more
Creating a Standalone Spark Application in Scala: A Step-by-Step Guide with Twitter Streaming Example
This blog post will guide you through the process of building a Spark application in Scala that calculates popular hashtags from a Twitter stream. You will also learn how to use the sbt eclipse plugin to run the application in the Eclipse Integrated Development Environment (IDE). Whether you are new to big data processing or looking to improve your skills in data enginering and analytics, this tutorial has something to offer. Follow along with our step-by-step guide to develop your own stand alone Spark application and enhance your abilities in this exciting field.
Sharing some ideas about how to create a Spark-streaming stand-alone application and how to run the Spark applications in scala-SDK (Eclipse IDE).
Building Spark Application using SBT
A Standalone application in Scala using Apache Spark API. The application is build using Simple Build Tool(SBT).
For creating a stand alone app take the twitter popular tag example
This program calculates popular hashtags (popular topics) over sliding 10 and 60 second windows from a Twitter stream. The stream is instantiated with credentials and optionally filters supplied by the command line arguments.
But here modified the code for talking twitter authentication credentials through command line argument. So it needs to give the arguments as
Blogs
read more
Installing Apache Spark on Ubuntu-12.04
Update: To install Apache Spark-1.0 follow this post
Apache Spark is an open source in memory cluster computing framework. Initially developed in UC Berkely AMPLab and now an Apache Incubator Project. Apache Spark is a cluster computing framework designed for low-latency iterative jobs and interactive use from an interpreter. It provides clean, language-integrated APIs in Scala, Java, and Python, with a rich array of parallel operators. You may read more about it here
You can download the Apache Spark distribution(0.8.0-incubating) from here. After that untar the downloaded file.
$ tar xvf spark-0.8.0-incubating.tgz
You need to have Scala installed, or the SCALA_HOME environment variable pointing to a Scala installation.
Building
SBT(Simple Build Tool) is used for building Spark, which is bundled with it. To compile the code
Tag: Big Data
Blogs
Performance Tuning on Apache Spark
Performance tuning is an important aspect of working with Apache Spark, as it can help ensure that your data processing tasks are efficient and run smoothly. In this blog post, we will delve into the common issues that can be considered when tuning the performance of Apache Spark. These issues include spill, skew, shuffle, storage, and serialization.
Spill One problem that can occur is spill, which is the writing of temp files to disk due to a lack of memory.
read more
Blogs
read more
Install Apache Spark 2 on Ubuntu 16.04 and Mac OS
Two of the earlier posts are discussing installing Apache Spark-0.8.0 and Apache Spark-1.1.0 on Ubuntu-12.04 and Ubuntu-14.04 respectively. In this post you can discover necessary actions to set up Apache Spark-2.0.2 on Ubuntu 16.04 and Mac OS X Sierra. For enhanced guidance refer above mentioned posts.
Blogs
How to Run a PySpark Notebook with Docker
Apache Spark is a powerful big data processing engine that is well-suited for use in a distributed environment. One way to interact with Spark is through the use of an IPython Notebook, which allows you to run and debug your Spark code in an interactive manner. This tutorial will guide you through the process of setting up and running a PySpark Notebook using Docker.
Installing Docker Docker is a containerization platform that allows you to package and deploy your applications in a predictable and isolated environment.
read more
Blogs
read more
Self Contained PySpark Application
In my previous post, I wrote about installation of Spark and Scala interactive shell. Here in this post, we’ll see how to do the same in Python.
Similar to Scala interactive shell, there is an interactive shell available for Python. You can run it with the below command from spark root folder:
./bin/pyspark
Now you can enjoy Spark using Python interactive shell.
This shell might be sufficient for experimentations and developments. However, for production level, we should use a standalone application.
Blogs
read more
Install Apache Spark on Ubuntu-14.04
Update: For Apache Spark 2 refer latest post
One of the previous post mentioning about install Apache Spark-0.8.0 on Ubuntu-12.04. In this post explain about detailed steps to set up Apache Spark-1.1.0 on Ubuntu. For running Spark in Ubuntu machine should install Java. Using following commands easily install Java in Ubuntu machine.
	$ sudo apt-add-repository ppa:webupd8team/java
	$ sudo apt-get update
	$ sudo apt-get install oracle-java7-installer
To check the Java installation is successful
$ java -version
It shows installed java version
java version "1.7.0_72"_ Java(TM) SE Runtime Environment (build 1.7.0_72-b14)_ Java HotSpot(TM) 64-Bit Server VM (build 24.72-b04, mixed mode)
In next step is install Scala, follow the following instructions to set up Scala.
Blogs
read more
Creating an Assembled JAR for a Standalone Spark Application
In this post, we will discuss how to create an assembled JAR for a standalone Spark application using the sbt-assembly plugin. One of my previous posts, we discussed how to build a stand alone Spark Application using SBT eclipse plugin. Now, we will take it one step further and show you how to create a fat JAR for your Spark project using the sbt-assembly plugin.
Adding the sbt-assembly Plugin
The first step in creating an assembled JAR for your Spark application is to add the sbt-assembly plugin. To do this, you will need to add the following line to the project/plugin.sbt file:
addSbtPlugin("com.eed3si9n" % "sbt-assembly" % "0.9.1")
Configuring Assembly Settings
Next, you will need to specify sbt-assembly.git as a dependency in the project/project/build.scala file:
import sbt._

object Plugins extends Build {
  lazy val root = Project("root", file(".")) dependsOn(
    uri("git://github.com/sbt/sbt-assembly.git#0.9.1")
  )
}
In the build.sbt file, add the following contents:
Blogs
read more
Creating a Standalone Spark Application in Scala: A Step-by-Step Guide with Twitter Streaming Example
This blog post will guide you through the process of building a Spark application in Scala that calculates popular hashtags from a Twitter stream. You will also learn how to use the sbt eclipse plugin to run the application in the Eclipse Integrated Development Environment (IDE). Whether you are new to big data processing or looking to improve your skills in data enginering and analytics, this tutorial has something to offer. Follow along with our step-by-step guide to develop your own stand alone Spark application and enhance your abilities in this exciting field.
Sharing some ideas about how to create a Spark-streaming stand-alone application and how to run the Spark applications in scala-SDK (Eclipse IDE).
Building Spark Application using SBT
A Standalone application in Scala using Apache Spark API. The application is build using Simple Build Tool(SBT).
For creating a stand alone app take the twitter popular tag example
This program calculates popular hashtags (popular topics) over sliding 10 and 60 second windows from a Twitter stream. The stream is instantiated with credentials and optionally filters supplied by the command line arguments.
But here modified the code for talking twitter authentication credentials through command line argument. So it needs to give the arguments as
Blogs
read more
Installing Apache Spark on Ubuntu-12.04
Update: To install Apache Spark-1.0 follow this post
Apache Spark is an open source in memory cluster computing framework. Initially developed in UC Berkely AMPLab and now an Apache Incubator Project. Apache Spark is a cluster computing framework designed for low-latency iterative jobs and interactive use from an interpreter. It provides clean, language-integrated APIs in Scala, Java, and Python, with a rich array of parallel operators. You may read more about it here
You can download the Apache Spark distribution(0.8.0-incubating) from here. After that untar the downloaded file.
$ tar xvf spark-0.8.0-incubating.tgz
You need to have Scala installed, or the SCALA_HOME environment variable pointing to a Scala installation.
Building
SBT(Simple Build Tool) is used for building Spark, which is bundled with it. To compile the code
Blogs
read more
Running Mesos-0.13.0 on Ubuntu-12.04
You will need the following packages to run Mesos.
$ sudo apt-get install python2.7-dev g++ libcppunit-dev libunwind7-dev git libcurl4-nss-dev
You need to have Java installed, or the JAVA_HOME environment variable pointing to a Java installation.
You can download the Mesos distribution from here. After that untar the downloaded file
$ tar xvf mesos-0.13.0.tar.gz
Building and Installing
$ cd mesos-0.13.0
$ mkdir build
$ cd build
$ sudo  ../configure --prefix=/home/user/mesos
$ sudo make
$ sudo make check
$ sudo make install
You can pass the –prefix option while configuring to tell where to install. For example
Blogs
MQTT Publisher and Subscriber in Scala: A Step-by-Step Guide Using Eclipse Paho
What is MQTT? MQTT (Message Queuing Telemetry Transport) is a publish-subscribe based lightweight messaging protocol for use on top of the TCP/IP protocol. It was designed to be used in resource-constrained environments and for communication between devices with low-bandwidth or unreliable networks. MQTT is often used in Internet of Things (IoT) applications to communicate between devices and a central server, as well as in other types of messaging systems. In an MQTT system, there is a central broker that receives messages from publishers and routes them to subscribers that are subscribed to the relevant topic.
read more
Tag: Performance Tuning
Blogs
Performance Tuning on Apache Spark
Performance tuning is an important aspect of working with Apache Spark, as it can help ensure that your data processing tasks are efficient and run smoothly. In this blog post, we will delve into the common issues that can be considered when tuning the performance of Apache Spark. These issues include spill, skew, shuffle, storage, and serialization.
Spill One problem that can occur is spill, which is the writing of temp files to disk due to a lack of memory.
read more
Tag: PySpark
Blogs
Performance Tuning on Apache Spark
Performance tuning is an important aspect of working with Apache Spark, as it can help ensure that your data processing tasks are efficient and run smoothly. In this blog post, we will delve into the common issues that can be considered when tuning the performance of Apache Spark. These issues include spill, skew, shuffle, storage, and serialization.
Spill One problem that can occur is spill, which is the writing of temp files to disk due to a lack of memory.
read more
Blogs
How to Run a PySpark Notebook with Docker
Apache Spark is a powerful big data processing engine that is well-suited for use in a distributed environment. One way to interact with Spark is through the use of an IPython Notebook, which allows you to run and debug your Spark code in an interactive manner. This tutorial will guide you through the process of setting up and running a PySpark Notebook using Docker.
Installing Docker Docker is a containerization platform that allows you to package and deploy your applications in a predictable and isolated environment.
read more
Blogs
read more
Self Contained PySpark Application
In my previous post, I wrote about installation of Spark and Scala interactive shell. Here in this post, we’ll see how to do the same in Python.
Similar to Scala interactive shell, there is an interactive shell available for Python. You can run it with the below command from spark root folder:
./bin/pyspark
Now you can enjoy Spark using Python interactive shell.
This shell might be sufficient for experimentations and developments. However, for production level, we should use a standalone application.
Tag: Mac OS X
Blogs
read more
Install Apache Spark 2 on Ubuntu 16.04 and Mac OS
Two of the earlier posts are discussing installing Apache Spark-0.8.0 and Apache Spark-1.1.0 on Ubuntu-12.04 and Ubuntu-14.04 respectively. In this post you can discover necessary actions to set up Apache Spark-2.0.2 on Ubuntu 16.04 and Mac OS X Sierra. For enhanced guidance refer above mentioned posts.
Tag: Ubuntu
Blogs
read more
Install Apache Spark 2 on Ubuntu 16.04 and Mac OS
Two of the earlier posts are discussing installing Apache Spark-0.8.0 and Apache Spark-1.1.0 on Ubuntu-12.04 and Ubuntu-14.04 respectively. In this post you can discover necessary actions to set up Apache Spark-2.0.2 on Ubuntu 16.04 and Mac OS X Sierra. For enhanced guidance refer above mentioned posts.
Tag: Docker
Blogs
How to Run a PySpark Notebook with Docker
Apache Spark is a powerful big data processing engine that is well-suited for use in a distributed environment. One way to interact with Spark is through the use of an IPython Notebook, which allows you to run and debug your Spark code in an interactive manner. This tutorial will guide you through the process of setting up and running a PySpark Notebook using Docker.
Installing Docker Docker is a containerization platform that allows you to package and deploy your applications in a predictable and isolated environment.
read more
Tag: IPython Notebook
Blogs
How to Run a PySpark Notebook with Docker
Apache Spark is a powerful big data processing engine that is well-suited for use in a distributed environment. One way to interact with Spark is through the use of an IPython Notebook, which allows you to run and debug your Spark code in an interactive manner. This tutorial will guide you through the process of setting up and running a PySpark Notebook using Docker.
Installing Docker Docker is a containerization platform that allows you to package and deploy your applications in a predictable and isolated environment.
read more
Tag: Python
Blogs
How to Run a PySpark Notebook with Docker
Apache Spark is a powerful big data processing engine that is well-suited for use in a distributed environment. One way to interact with Spark is through the use of an IPython Notebook, which allows you to run and debug your Spark code in an interactive manner. This tutorial will guide you through the process of setting up and running a PySpark Notebook using Docker.
Installing Docker Docker is a containerization platform that allows you to package and deploy your applications in a predictable and isolated environment.
read more
Blogs
read more
Self Contained PySpark Application
In my previous post, I wrote about installation of Spark and Scala interactive shell. Here in this post, we’ll see how to do the same in Python.
Similar to Scala interactive shell, there is an interactive shell available for Python. You can run it with the below command from spark root folder:
./bin/pyspark
Now you can enjoy Spark using Python interactive shell.
This shell might be sufficient for experimentations and developments. However, for production level, we should use a standalone application.
Blogs
 read more
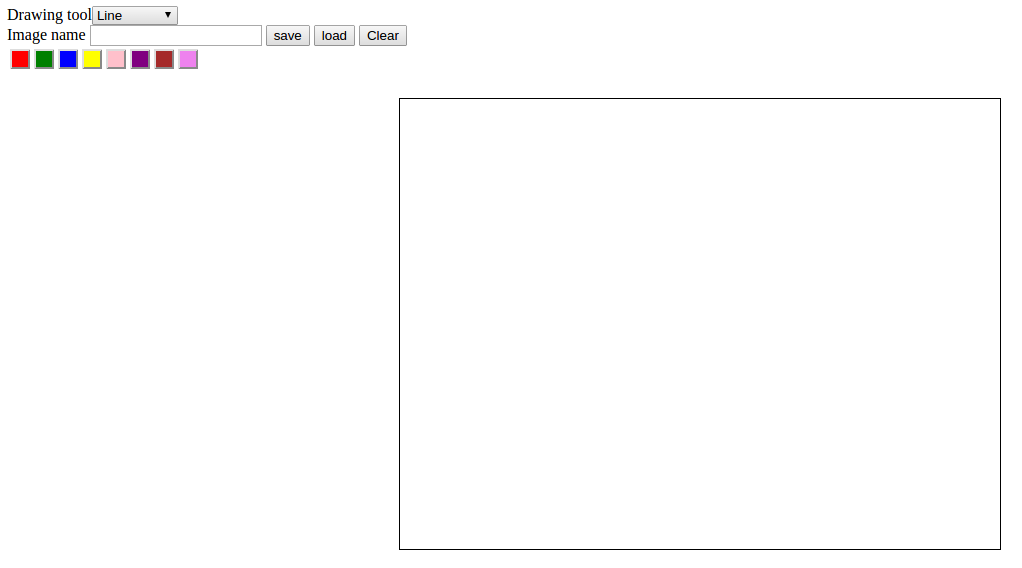
Paint app using JavaScript and Canvas
An application to draw simple drawings using lines, rectangles and circles in different colours.
The application is developed using JavaScript and HTML5. The canvas feature in HTML5 is used for providing a drawable region. The JavaScript is used to handle drawing functions in this region. The select button to select the different tools to draw.
Blogs
read more
Developing a simple game with HTML5/canvas
HTML5 is the new HTML standard. One of the most interesting new features in HTML5 is the canvas element canvas for 2D drawing. A canvas is a rectangular area on an HTML page. All drawing on the canvas must be done using JavaScript. This post goes through the basics of implementing a 2D canvas context, and using the basic canvas functions for developing a simple game. Creating a canvad context, adding the canvas element to your HTML document like so
<canvas id="Canvas" width="800" height="450"></canvas>
To draw inside the canvas need to use Javascript. First find the canvas element using getElementById, then initialize the context.
	<script>
	var canvas = documnet.getElementById("Canvas");
	var context = canvas.getContext("2d")


	</script>
To draw text on a canvas, the most import property and methods are:
Blogs
AM Wave Generation and Plotting with Matplotlib Python: A Detailed Guide
Amplitude Modulation (AM) is a type of analog communication in which the amplitude of a carrier signal is varied in proportion to the message signal. It is one of the oldest and most widely used forms of radio communication, and it is still used in many applications today, including AM radio broadcasting and certain types of military and aviation communications.
In this blog post, we will learn how to generate and plot AM waves using the Python library Matplotlib.
read more
Tag: JAR creation
Blogs
read more
Creating an Assembled JAR for a Standalone Spark Application
In this post, we will discuss how to create an assembled JAR for a standalone Spark application using the sbt-assembly plugin. One of my previous posts, we discussed how to build a stand alone Spark Application using SBT eclipse plugin. Now, we will take it one step further and show you how to create a fat JAR for your Spark project using the sbt-assembly plugin.
Adding the sbt-assembly Plugin
The first step in creating an assembled JAR for your Spark application is to add the sbt-assembly plugin. To do this, you will need to add the following line to the project/plugin.sbt file:
addSbtPlugin("com.eed3si9n" % "sbt-assembly" % "0.9.1")
Configuring Assembly Settings
Next, you will need to specify sbt-assembly.git as a dependency in the project/project/build.scala file:
import sbt._

object Plugins extends Build {
  lazy val root = Project("root", file(".")) dependsOn(
    uri("git://github.com/sbt/sbt-assembly.git#0.9.1")
  )
}
In the build.sbt file, add the following contents:
Tag: SBT
Blogs
read more
Creating an Assembled JAR for a Standalone Spark Application
In this post, we will discuss how to create an assembled JAR for a standalone Spark application using the sbt-assembly plugin. One of my previous posts, we discussed how to build a stand alone Spark Application using SBT eclipse plugin. Now, we will take it one step further and show you how to create a fat JAR for your Spark project using the sbt-assembly plugin.
Adding the sbt-assembly Plugin
The first step in creating an assembled JAR for your Spark application is to add the sbt-assembly plugin. To do this, you will need to add the following line to the project/plugin.sbt file:
addSbtPlugin("com.eed3si9n" % "sbt-assembly" % "0.9.1")
Configuring Assembly Settings
Next, you will need to specify sbt-assembly.git as a dependency in the project/project/build.scala file:
import sbt._

object Plugins extends Build {
  lazy val root = Project("root", file(".")) dependsOn(
    uri("git://github.com/sbt/sbt-assembly.git#0.9.1")
  )
}
In the build.sbt file, add the following contents:
Blogs
read more
Creating a Standalone Spark Application in Scala: A Step-by-Step Guide with Twitter Streaming Example
This blog post will guide you through the process of building a Spark application in Scala that calculates popular hashtags from a Twitter stream. You will also learn how to use the sbt eclipse plugin to run the application in the Eclipse Integrated Development Environment (IDE). Whether you are new to big data processing or looking to improve your skills in data enginering and analytics, this tutorial has something to offer. Follow along with our step-by-step guide to develop your own stand alone Spark application and enhance your abilities in this exciting field.
Sharing some ideas about how to create a Spark-streaming stand-alone application and how to run the Spark applications in scala-SDK (Eclipse IDE).
Building Spark Application using SBT
A Standalone application in Scala using Apache Spark API. The application is build using Simple Build Tool(SBT).
For creating a stand alone app take the twitter popular tag example
This program calculates popular hashtags (popular topics) over sliding 10 and 60 second windows from a Twitter stream. The stream is instantiated with credentials and optionally filters supplied by the command line arguments.
But here modified the code for talking twitter authentication credentials through command line argument. So it needs to give the arguments as
Tag: Scala
Blogs
read more
Creating an Assembled JAR for a Standalone Spark Application
In this post, we will discuss how to create an assembled JAR for a standalone Spark application using the sbt-assembly plugin. One of my previous posts, we discussed how to build a stand alone Spark Application using SBT eclipse plugin. Now, we will take it one step further and show you how to create a fat JAR for your Spark project using the sbt-assembly plugin.
Adding the sbt-assembly Plugin
The first step in creating an assembled JAR for your Spark application is to add the sbt-assembly plugin. To do this, you will need to add the following line to the project/plugin.sbt file:
addSbtPlugin("com.eed3si9n" % "sbt-assembly" % "0.9.1")
Configuring Assembly Settings
Next, you will need to specify sbt-assembly.git as a dependency in the project/project/build.scala file:
import sbt._

object Plugins extends Build {
  lazy val root = Project("root", file(".")) dependsOn(
    uri("git://github.com/sbt/sbt-assembly.git#0.9.1")
  )
}
In the build.sbt file, add the following contents:
Blogs
read more
Creating a Standalone Spark Application in Scala: A Step-by-Step Guide with Twitter Streaming Example
This blog post will guide you through the process of building a Spark application in Scala that calculates popular hashtags from a Twitter stream. You will also learn how to use the sbt eclipse plugin to run the application in the Eclipse Integrated Development Environment (IDE). Whether you are new to big data processing or looking to improve your skills in data enginering and analytics, this tutorial has something to offer. Follow along with our step-by-step guide to develop your own stand alone Spark application and enhance your abilities in this exciting field.
Sharing some ideas about how to create a Spark-streaming stand-alone application and how to run the Spark applications in scala-SDK (Eclipse IDE).
Building Spark Application using SBT
A Standalone application in Scala using Apache Spark API. The application is build using Simple Build Tool(SBT).
For creating a stand alone app take the twitter popular tag example
This program calculates popular hashtags (popular topics) over sliding 10 and 60 second windows from a Twitter stream. The stream is instantiated with credentials and optionally filters supplied by the command line arguments.
But here modified the code for talking twitter authentication credentials through command line argument. So it needs to give the arguments as
Blogs
MQTT Publisher and Subscriber in Scala: A Step-by-Step Guide Using Eclipse Paho
What is MQTT? MQTT (Message Queuing Telemetry Transport) is a publish-subscribe based lightweight messaging protocol for use on top of the TCP/IP protocol. It was designed to be used in resource-constrained environments and for communication between devices with low-bandwidth or unreliable networks. MQTT is often used in Internet of Things (IoT) applications to communicate between devices and a central server, as well as in other types of messaging systems. In an MQTT system, there is a central broker that receives messages from publishers and routes them to subscribers that are subscribed to the relevant topic.
read more
Tag: Data Engineering
Blogs
read more
Creating a Standalone Spark Application in Scala: A Step-by-Step Guide with Twitter Streaming Example
This blog post will guide you through the process of building a Spark application in Scala that calculates popular hashtags from a Twitter stream. You will also learn how to use the sbt eclipse plugin to run the application in the Eclipse Integrated Development Environment (IDE). Whether you are new to big data processing or looking to improve your skills in data enginering and analytics, this tutorial has something to offer. Follow along with our step-by-step guide to develop your own stand alone Spark application and enhance your abilities in this exciting field.
Sharing some ideas about how to create a Spark-streaming stand-alone application and how to run the Spark applications in scala-SDK (Eclipse IDE).
Building Spark Application using SBT
A Standalone application in Scala using Apache Spark API. The application is build using Simple Build Tool(SBT).
For creating a stand alone app take the twitter popular tag example
This program calculates popular hashtags (popular topics) over sliding 10 and 60 second windows from a Twitter stream. The stream is instantiated with credentials and optionally filters supplied by the command line arguments.
But here modified the code for talking twitter authentication credentials through command line argument. So it needs to give the arguments as
Tag: Apache Mesos
Blogs
read more
Running Mesos-0.13.0 on Ubuntu-12.04
You will need the following packages to run Mesos.
$ sudo apt-get install python2.7-dev g++ libcppunit-dev libunwind7-dev git libcurl4-nss-dev
You need to have Java installed, or the JAVA_HOME environment variable pointing to a Java installation.
You can download the Mesos distribution from here. After that untar the downloaded file
$ tar xvf mesos-0.13.0.tar.gz
Building and Installing
$ cd mesos-0.13.0
$ mkdir build
$ cd build
$ sudo  ../configure --prefix=/home/user/mesos
$ sudo make
$ sudo make check
$ sudo make install
You can pass the –prefix option while configuring to tell where to install. For example
Tag: IoT
Blogs
MQTT Publisher and Subscriber in Scala: A Step-by-Step Guide Using Eclipse Paho
What is MQTT? MQTT (Message Queuing Telemetry Transport) is a publish-subscribe based lightweight messaging protocol for use on top of the TCP/IP protocol. It was designed to be used in resource-constrained environments and for communication between devices with low-bandwidth or unreliable networks. MQTT is often used in Internet of Things (IoT) applications to communicate between devices and a central server, as well as in other types of messaging systems. In an MQTT system, there is a central broker that receives messages from publishers and routes them to subscribers that are subscribed to the relevant topic.
read more
Tag: Message Queue
Blogs
MQTT Publisher and Subscriber in Scala: A Step-by-Step Guide Using Eclipse Paho
What is MQTT? MQTT (Message Queuing Telemetry Transport) is a publish-subscribe based lightweight messaging protocol for use on top of the TCP/IP protocol. It was designed to be used in resource-constrained environments and for communication between devices with low-bandwidth or unreliable networks. MQTT is often used in Internet of Things (IoT) applications to communicate between devices and a central server, as well as in other types of messaging systems. In an MQTT system, there is a central broker that receives messages from publishers and routes them to subscribers that are subscribed to the relevant topic.
read more
Tag: MQTT
Blogs
MQTT Publisher and Subscriber in Scala: A Step-by-Step Guide Using Eclipse Paho
What is MQTT? MQTT (Message Queuing Telemetry Transport) is a publish-subscribe based lightweight messaging protocol for use on top of the TCP/IP protocol. It was designed to be used in resource-constrained environments and for communication between devices with low-bandwidth or unreliable networks. MQTT is often used in Internet of Things (IoT) applications to communicate between devices and a central server, as well as in other types of messaging systems. In an MQTT system, there is a central broker that receives messages from publishers and routes them to subscribers that are subscribed to the relevant topic.
read more
Tag: No SQL Data Base
Blogs
read more
Paint App using Flask with MongoDB
Here the paint app is modified using with a new database system. The MongoDB is a famous NoSQL database system. The NoSQL database is a simple lightweight mechanism. It provides high scalability and availability. It provides horizontal scaling of data. This system redefined the database concept from the traditional relational database system. MongoDB is an open-source, document-oriented database designed for ease of development and scaling. The main features of MongoDB are flexibility, power, speed, and ease of use. The MongoDB can installed in local machine by following the instructions from official website
Some commands used in the MonoDB operations are given below:
db :- After starting the mongo shell your session will use the test database for context, by default. At any time issue the above operation at the mongo to report the current database.
show dbs :- Display the list of databases from the mongo shell.
use mydb :- Switch to a new database named mydb.
help :- At any point you can access help for the mango shell using this operation.
db.things.insert() :- Insert documents into the collection things.When you insert the first document, the mangod will create both the database and the things collection.
show collections :- Displays the available collections in the database.
db.things.find() :- Finds the documents in the collection. The documents to be found can be specified through arguments of the find function. The cursor of the MongoDB displays only the first 20 output documents. it command is used to display the rest of the documents.
The source code is available in
Tag: Python Flask
Blogs
read more
Paint App using Flask with MongoDB
Here the paint app is modified using with a new database system. The MongoDB is a famous NoSQL database system. The NoSQL database is a simple lightweight mechanism. It provides high scalability and availability. It provides horizontal scaling of data. This system redefined the database concept from the traditional relational database system. MongoDB is an open-source, document-oriented database designed for ease of development and scaling. The main features of MongoDB are flexibility, power, speed, and ease of use. The MongoDB can installed in local machine by following the instructions from official website
Some commands used in the MonoDB operations are given below:
db :- After starting the mongo shell your session will use the test database for context, by default. At any time issue the above operation at the mongo to report the current database.
show dbs :- Display the list of databases from the mongo shell.
use mydb :- Switch to a new database named mydb.
help :- At any point you can access help for the mango shell using this operation.
db.things.insert() :- Insert documents into the collection things.When you insert the first document, the mangod will create both the database and the things collection.
show collections :- Displays the available collections in the database.
db.things.find() :- Finds the documents in the collection. The documents to be found can be specified through arguments of the find function. The cursor of the MongoDB displays only the first 20 output documents. it command is used to display the rest of the documents.
The source code is available in
Blogs
read more
Paint app using JavaScript and Canvas
An application to draw simple drawings using lines, rectangles and circles in different colours.
The application is developed using JavaScript and HTML5. The canvas feature in HTML5 is used for providing a drawable region. The JavaScript is used to handle drawing functions in this region. The select button to select the different tools to draw.
Tag: GoogleAppEngine
Blogs
read more
Paint app using JavaScript and Canvas
An application to draw simple drawings using lines, rectangles and circles in different colours.
The application is developed using JavaScript and HTML5. The canvas feature in HTML5 is used for providing a drawable region. The JavaScript is used to handle drawing functions in this region. The select button to select the different tools to draw.
Tag: JavaScript
Blogs
read more
Paint app using JavaScript and Canvas
An application to draw simple drawings using lines, rectangles and circles in different colours.
The application is developed using JavaScript and HTML5. The canvas feature in HTML5 is used for providing a drawable region. The JavaScript is used to handle drawing functions in this region. The select button to select the different tools to draw.
Tag: CUDA
Blogs
read more
Introduction to GPU Programming with CUDA: A Step-by-Step Guide to Key Concepts and Functions
This blog post is an introduction to the world of GPU programming with CUDA. We will cover the fundamental concepts and tools necessary to get started with CUDA, including:
- The steps involved in a typical GPU program, such as allocating storage on the GPU, transferring data between the CPU and GPU, and launching kernels on the GPU to process the data.
- How to use the Nvidia C Compiler (nvcc) to compile CUDA code and follow conventions like naming GPU data with a “d” prefix.
- Key functions like cudaMalloc and cudaMemcpy that are used to allocate GPU memory and transfer data between the host and device.
- The kernel launch operator and how to set the number of blocks and threads in the grid, as well as how to pass arguments to the kernel function.
- The importance of error checking in CUDA code.
To help illustrate these concepts, provided a simple example code that computes the squares of 64 numbers using CUDA. By the end of this post, you will have a basic foundation in GPU programming with CUDA and be ready to write your own programs and experience the performance benefits of using the GPU for parallel processing.
In my previous post I wrote about an introduction to parallel programming with CUDA. In this post explaining a simple example CUDA code to compute squares of 64 numbers. A typical GPU program consists of following steps.
1- CPU allocates storage on GPU
2- CPU copies input data from CPU to GPU
3- CPU launch kernels on GPU to process the data
4- CPU copies result back to CPU from GPU
nvcc -o square square.cu
Here is instead of running the regular C compiler we are running nvcc, the Nvidia C Compiler. The output is going to go an executable called square and our input file is “square.cu”. cu is the convention for how we name.Source code is available on github
We are going to walk through the CPU code first.
Tag: GPU programming
Blogs
read more
Introduction to GPU Programming with CUDA: A Step-by-Step Guide to Key Concepts and Functions
This blog post is an introduction to the world of GPU programming with CUDA. We will cover the fundamental concepts and tools necessary to get started with CUDA, including:
- The steps involved in a typical GPU program, such as allocating storage on the GPU, transferring data between the CPU and GPU, and launching kernels on the GPU to process the data.
- How to use the Nvidia C Compiler (nvcc) to compile CUDA code and follow conventions like naming GPU data with a “d” prefix.
- Key functions like cudaMalloc and cudaMemcpy that are used to allocate GPU memory and transfer data between the host and device.
- The kernel launch operator and how to set the number of blocks and threads in the grid, as well as how to pass arguments to the kernel function.
- The importance of error checking in CUDA code.
To help illustrate these concepts, provided a simple example code that computes the squares of 64 numbers using CUDA. By the end of this post, you will have a basic foundation in GPU programming with CUDA and be ready to write your own programs and experience the performance benefits of using the GPU for parallel processing.
In my previous post I wrote about an introduction to parallel programming with CUDA. In this post explaining a simple example CUDA code to compute squares of 64 numbers. A typical GPU program consists of following steps.
1- CPU allocates storage on GPU
2- CPU copies input data from CPU to GPU
3- CPU launch kernels on GPU to process the data
4- CPU copies result back to CPU from GPU
nvcc -o square square.cu
Here is instead of running the regular C compiler we are running nvcc, the Nvidia C Compiler. The output is going to go an executable called square and our input file is “square.cu”. cu is the convention for how we name.Source code is available on github
We are going to walk through the CPU code first.
Tag: Parallel programming
Blogs
read more
Introduction to GPU Programming with CUDA: A Step-by-Step Guide to Key Concepts and Functions
This blog post is an introduction to the world of GPU programming with CUDA. We will cover the fundamental concepts and tools necessary to get started with CUDA, including:
- The steps involved in a typical GPU program, such as allocating storage on the GPU, transferring data between the CPU and GPU, and launching kernels on the GPU to process the data.
- How to use the Nvidia C Compiler (nvcc) to compile CUDA code and follow conventions like naming GPU data with a “d” prefix.
- Key functions like cudaMalloc and cudaMemcpy that are used to allocate GPU memory and transfer data between the host and device.
- The kernel launch operator and how to set the number of blocks and threads in the grid, as well as how to pass arguments to the kernel function.
- The importance of error checking in CUDA code.
To help illustrate these concepts, provided a simple example code that computes the squares of 64 numbers using CUDA. By the end of this post, you will have a basic foundation in GPU programming with CUDA and be ready to write your own programs and experience the performance benefits of using the GPU for parallel processing.
In my previous post I wrote about an introduction to parallel programming with CUDA. In this post explaining a simple example CUDA code to compute squares of 64 numbers. A typical GPU program consists of following steps.
1- CPU allocates storage on GPU
2- CPU copies input data from CPU to GPU
3- CPU launch kernels on GPU to process the data
4- CPU copies result back to CPU from GPU
nvcc -o square square.cu
Here is instead of running the regular C compiler we are running nvcc, the Nvidia C Compiler. The output is going to go an executable called square and our input file is “square.cu”. cu is the convention for how we name.Source code is available on github
We are going to walk through the CPU code first.
Tag: Google App Engine
Blogs
read more
Developing a simple game with HTML5/canvas
HTML5 is the new HTML standard. One of the most interesting new features in HTML5 is the canvas element canvas for 2D drawing. A canvas is a rectangular area on an HTML page. All drawing on the canvas must be done using JavaScript. This post goes through the basics of implementing a 2D canvas context, and using the basic canvas functions for developing a simple game. Creating a canvad context, adding the canvas element to your HTML document like so
<canvas id="Canvas" width="800" height="450"></canvas>
To draw inside the canvas need to use Javascript. First find the canvas element using getElementById, then initialize the context.
	<script>
	var canvas = documnet.getElementById("Canvas");
	var context = canvas.getContext("2d")


	</script>
To draw text on a canvas, the most import property and methods are:
Tag: HTML5
Blogs
read more
Developing a simple game with HTML5/canvas
HTML5 is the new HTML standard. One of the most interesting new features in HTML5 is the canvas element canvas for 2D drawing. A canvas is a rectangular area on an HTML page. All drawing on the canvas must be done using JavaScript. This post goes through the basics of implementing a 2D canvas context, and using the basic canvas functions for developing a simple game. Creating a canvad context, adding the canvas element to your HTML document like so
<canvas id="Canvas" width="800" height="450"></canvas>
To draw inside the canvas need to use Javascript. First find the canvas element using getElementById, then initialize the context.
	<script>
	var canvas = documnet.getElementById("Canvas");
	var context = canvas.getContext("2d")


	</script>
To draw text on a canvas, the most import property and methods are:
Tag: AVR
Blogs
read more
Finding RC constant using ATmega8
The time constant(sec) of an RC circuit is equal to the product of the resistance and the capacitance of the circuit.
It is the time required to charge the capacitor through the resistor to 63. 2% of full charge,or to discharge it to 36.8% of its initial voltage.
The voltage of the RC circuit is measured using adc of the ATmega8, input voltage for RC circuit is given from PB0. The timer is started at the time of the PB0 making 1 .
The adc of ATmega8(ADCH) is 8 bit long so corresponding to 5V get 255 in ADCH. The TCNT1 value is taken to a variable when the output voltage of the RC circuit become 63.2% of the input voltage.That is 3.16 v corresponding to these voltage ADCH show 161(appr).
Using an LCD can show the TCNT1 value. TCNT1 is 16 bit long.Here ATmega8 running in 8MHz clock,timer prescaled by 1024.
So if you get the real time multiply the TCNT1 value to (1024/8000000).
Some test examples:
Blogs
AVR Programming Made Easy: How to Build a USBtinyISP with an attiny2313
AVR microcontrollers are a popular choice for use in a wide range of applications, including embedded systems, robotics, and more. They are known for their low cost, versatility, and efficient use of resources, which make them an attractive choice for many developers. If you are working with AVR chips, you will need a programmer to burn programs onto them.
One option for an AVR programmer is the USBtinyISP, which is a simple and low cost solution based on the attiny2313 microcontroller.
read more
Blogs
read more
Introduction to AVR programming
Atmel AVR 8-bit and 32-bit microcontrollers deliver a unique combination of performance, power efficiency, and design flexibility. Optimized to speed time to market, they are based on the industry’s most code-efficient architecture for C and assembly programming. No other microcontrollers deliver more computing performance with better power efficiency. Industry-leading development tools and design support let you get to market faster. Once there, the large AVR family lets you reuse your knowledge when improving your products and expanding to new markets—easily and cost-effectively.
package required in linux
binutils: Programs to manipulate binary and object files that may have been created for Atmel’s AVR architecture. This package is primarily for AVR developers and cross-compilers.
gcc-avr: The GNU C compiler, a fairly portable optimising compiler that supports multiple languages. This package includes C language support.
avr-libc: Standard library used for developing C programs for Atmel AVR microcontrollers. This package contains static libraries, as well as needed header files.
sample programme to blink a LED.
Tag: Embedded
Blogs
read more
Finding RC constant using ATmega8
The time constant(sec) of an RC circuit is equal to the product of the resistance and the capacitance of the circuit.
It is the time required to charge the capacitor through the resistor to 63. 2% of full charge,or to discharge it to 36.8% of its initial voltage.
The voltage of the RC circuit is measured using adc of the ATmega8, input voltage for RC circuit is given from PB0. The timer is started at the time of the PB0 making 1 .
The adc of ATmega8(ADCH) is 8 bit long so corresponding to 5V get 255 in ADCH. The TCNT1 value is taken to a variable when the output voltage of the RC circuit become 63.2% of the input voltage.That is 3.16 v corresponding to these voltage ADCH show 161(appr).
Using an LCD can show the TCNT1 value. TCNT1 is 16 bit long.Here ATmega8 running in 8MHz clock,timer prescaled by 1024.
So if you get the real time multiply the TCNT1 value to (1024/8000000).
Some test examples:
Blogs
read more
Running Arduino codes in stand alone atmega8
An Arduino board consists of an 8-bit Atmel AVR microcontroller with complementary components to facilitate programming and incorporation into other circuits. If you wish to study the arduino codes ,then one of the major problems is the availability and cost of the Arduino board. If you have an atmega8 microcontroller then you have to study the Arduino codes by simply changing some options in Arduino IDE.
First download the arduino IDE(I am using Arduino 1.0). Next you have to an avr programmer(I am using usbasp and usbtiny). Launch the arduino IDE as root.Then select your programmer from tools and also select your board in this case select ATmega8. Take care in fuse bytes because arduino codes are running in 8MHz.Y ou can enable internal 8MHz clock by
-U lfuse:w:0xa4:m -U hfuse:w:0xcc:m
Or you can enable the external crystal by setting the fuse byte as
Blogs
read more
LCD Interfacing using msp430
There is a pot connect to the ADC of msp430 Ao(pin p1.0). The values of ADC10MEM displayed using LCD.
The Vcc for pot is taken from msp430 launchpad.so maximum voltage is 3.6v.
The msp430 10 bit ADC operates in the range 0 to 3.6V. If the input voltage is 0V,
the ADC generates a 10 bit value:
0 0 0 0 0 0 0 0 0 0
which is numerically equal to 0.
When the input voltage is 3.6V, the ADC
generates a 10 bit pattern:
1 1 1 1 1 1 1 1 1 1
which is numerically equal to 1023.
These values are stored in ADC10MEM.
Blogs
read more
Introduction to AVR programming
Atmel AVR 8-bit and 32-bit microcontrollers deliver a unique combination of performance, power efficiency, and design flexibility. Optimized to speed time to market, they are based on the industry’s most code-efficient architecture for C and assembly programming. No other microcontrollers deliver more computing performance with better power efficiency. Industry-leading development tools and design support let you get to market faster. Once there, the large AVR family lets you reuse your knowledge when improving your products and expanding to new markets—easily and cost-effectively.
package required in linux
binutils: Programs to manipulate binary and object files that may have been created for Atmel’s AVR architecture. This package is primarily for AVR developers and cross-compilers.
gcc-avr: The GNU C compiler, a fairly portable optimising compiler that supports multiple languages. This package includes C language support.
avr-libc: Standard library used for developing C programs for Atmel AVR microcontrollers. This package contains static libraries, as well as needed header files.
sample programme to blink a LED.
Tag: Arduino
Blogs
read more
Running Arduino codes in stand alone atmega8
An Arduino board consists of an 8-bit Atmel AVR microcontroller with complementary components to facilitate programming and incorporation into other circuits. If you wish to study the arduino codes ,then one of the major problems is the availability and cost of the Arduino board. If you have an atmega8 microcontroller then you have to study the Arduino codes by simply changing some options in Arduino IDE.
First download the arduino IDE(I am using Arduino 1.0). Next you have to an avr programmer(I am using usbasp and usbtiny). Launch the arduino IDE as root.Then select your programmer from tools and also select your board in this case select ATmega8. Take care in fuse bytes because arduino codes are running in 8MHz.Y ou can enable internal 8MHz clock by
-U lfuse:w:0xa4:m -U hfuse:w:0xcc:m
Or you can enable the external crystal by setting the fuse byte as
Tag: attiny2313
Blogs
AVR Programming Made Easy: How to Build a USBtinyISP with an attiny2313
AVR microcontrollers are a popular choice for use in a wide range of applications, including embedded systems, robotics, and more. They are known for their low cost, versatility, and efficient use of resources, which make them an attractive choice for many developers. If you are working with AVR chips, you will need a programmer to burn programs onto them.
One option for an AVR programmer is the USBtinyISP, which is a simple and low cost solution based on the attiny2313 microcontroller.
read more
Tag: embedded systems
Blogs
AVR Programming Made Easy: How to Build a USBtinyISP with an attiny2313
AVR microcontrollers are a popular choice for use in a wide range of applications, including embedded systems, robotics, and more. They are known for their low cost, versatility, and efficient use of resources, which make them an attractive choice for many developers. If you are working with AVR chips, you will need a programmer to burn programs onto them.
One option for an AVR programmer is the USBtinyISP, which is a simple and low cost solution based on the attiny2313 microcontroller.
read more
Tag: microcontroller
Blogs
AVR Programming Made Easy: How to Build a USBtinyISP with an attiny2313
AVR microcontrollers are a popular choice for use in a wide range of applications, including embedded systems, robotics, and more. They are known for their low cost, versatility, and efficient use of resources, which make them an attractive choice for many developers. If you are working with AVR chips, you will need a programmer to burn programs onto them.
One option for an AVR programmer is the USBtinyISP, which is a simple and low cost solution based on the attiny2313 microcontroller.
read more
Tag: USBtinyISP
Blogs
AVR Programming Made Easy: How to Build a USBtinyISP with an attiny2313
AVR microcontrollers are a popular choice for use in a wide range of applications, including embedded systems, robotics, and more. They are known for their low cost, versatility, and efficient use of resources, which make them an attractive choice for many developers. If you are working with AVR chips, you will need a programmer to burn programs onto them.
One option for an AVR programmer is the USBtinyISP, which is a simple and low cost solution based on the attiny2313 microcontroller.
read more
Tag: LCD Interfacing
Blogs
read more
LCD Interfacing using msp430
There is a pot connect to the ADC of msp430 Ao(pin p1.0). The values of ADC10MEM displayed using LCD.
The Vcc for pot is taken from msp430 launchpad.so maximum voltage is 3.6v.
The msp430 10 bit ADC operates in the range 0 to 3.6V. If the input voltage is 0V,
the ADC generates a 10 bit value:
0 0 0 0 0 0 0 0 0 0
which is numerically equal to 0.
When the input voltage is 3.6V, the ADC
generates a 10 bit pattern:
1 1 1 1 1 1 1 1 1 1
which is numerically equal to 1023.
These values are stored in ADC10MEM.
Tag: MSP430
Blogs
read more
LCD Interfacing using msp430
There is a pot connect to the ADC of msp430 Ao(pin p1.0). The values of ADC10MEM displayed using LCD.
The Vcc for pot is taken from msp430 launchpad.so maximum voltage is 3.6v.
The msp430 10 bit ADC operates in the range 0 to 3.6V. If the input voltage is 0V,
the ADC generates a 10 bit value:
0 0 0 0 0 0 0 0 0 0
which is numerically equal to 0.
When the input voltage is 3.6V, the ADC
generates a 10 bit pattern:
1 1 1 1 1 1 1 1 1 1
which is numerically equal to 1023.
These values are stored in ADC10MEM.
Tag: Matplotlib
Blogs
AM Wave Generation and Plotting with Matplotlib Python: A Detailed Guide
Amplitude Modulation (AM) is a type of analog communication in which the amplitude of a carrier signal is varied in proportion to the message signal. It is one of the oldest and most widely used forms of radio communication, and it is still used in many applications today, including AM radio broadcasting and certain types of military and aviation communications.
In this blog post, we will learn how to generate and plot AM waves using the Python library Matplotlib.
read more